If you’ve ever tripped over a rake in the dark or spent ten minutes hunting for pruners that should’ve been hanging right where you left them, you already know the problem.
Garden tools multiply fast. One season you’ve got a shovel and some hand trowels, and by the next you’re wrestling with loppers, hose attachments, bags of plant food, and three different sizes of pruning shears, all dumped in a corner because nobody got around to giving them a home.
The thing is, disorganized tools don’t just waste your time. Metal blades rust faster when they’re tossed in a damp pile. Wooden handles crack when they’re left leaning at odd angles or get stepped on.
And honestly, a cluttered shed makes yard work feel like a chore before you’ve even picked up a single tool.
This is where DIY garden tool storage really earns its keep. You don’t need a $400 storage cabinet from a big box store to fix this.
Most of these projects use scrap wood, basic hardware, and an hour or two of your Saturday.
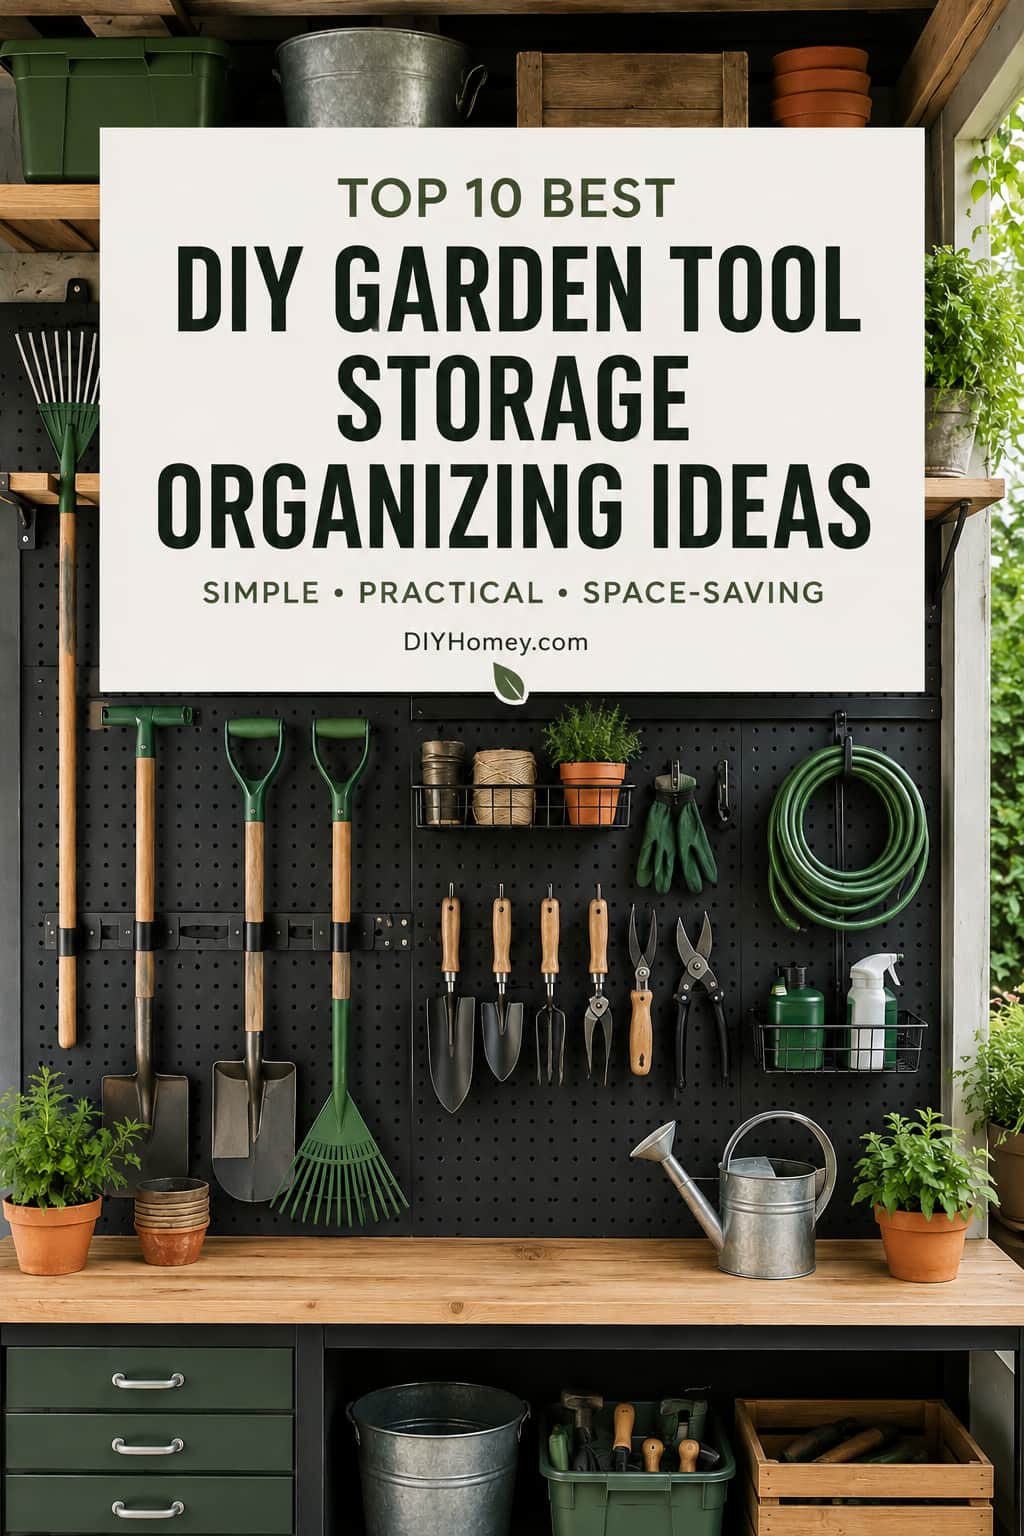
Best DIY Garden Tool Storage Organizing Ideas
Whether you’re working with a tiny shed, a one-car garage, or just a fence line out back, there’s a setup here that’ll fit.
1. DIY Garden Tool Storage Wall Rail System
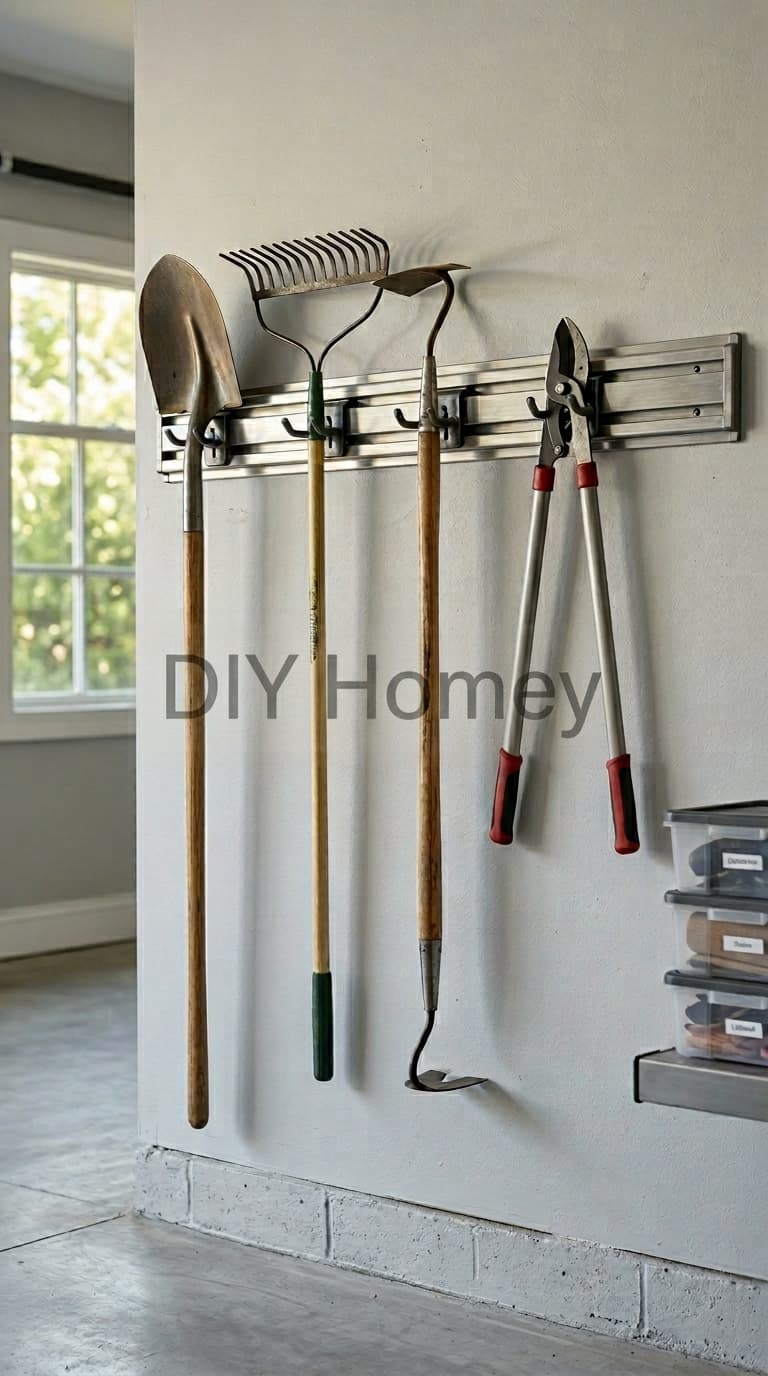
A rail system is probably the single most useful thing you can install in a garage or shed, and it’s the first project I’d point a beginner toward.
The hooks slide along the rail, so you’re not stuck with a fixed layout from day one. Got a new tool? Slide a hook over and add it.
This setup works best on a long, flat wall where tools currently lean against each other and fall over every time you grab one from the middle.
It solves the classic “domino effect” problem where pulling out a shovel knocks down everything next to it.
Homeowners like it because it’s adjustable, it keeps handles off the concrete (which helps with rust and rot), and it looks intentional instead of thrown together.
What You’ll Need
- Heavy-duty wall rail (steel, 4 to 6 feet)
- Sliding or adjustable tool hooks
- Drill with a stud-finder bit or a separate stud finder
- Wall anchors (if not hitting studs)
- Measuring tape
- Level
Quick How-To
Find your studs first, even if the rail comes with anchors. Mark a level line at a height comfortable for your tallest tool.
Screw the rail directly into studs for real holding power. Clip on the hooks, spacing them so handles don’t bump into each other, then hang tools heaviest to lightest, left to right.
Budget Tip: Skip the name-brand rail kits. A length of galvanized steel pegboard rail from a hardware store works just as well for half the price.
Organization Tip: Hang your most-used tools — trowel, pruners, gloves — closest to the door so you’re not walking the whole garage to grab them.
2. DIY Wooden Pallet Garden Tool Organizer
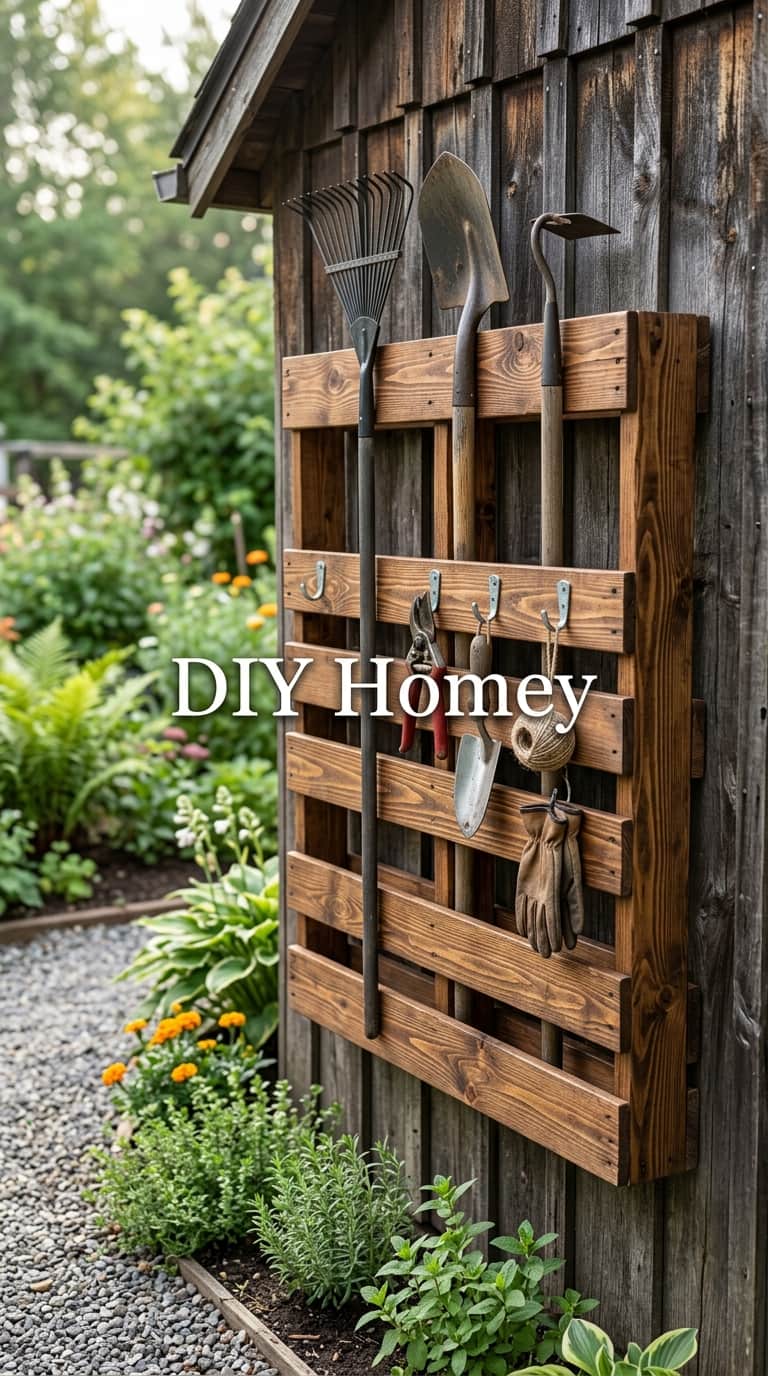
There’s something satisfying about turning a free pallet into actual storage instead of paying for one.
The gaps between the slats are basically built for slotting in long handles, so a lot of the design work is already done for you.
This is a great option if you’ve got a rustic or farmhouse-style yard and don’t mind a little visible wood grain and texture.
It works especially well leaned or bolted against a fence or the outside wall of a shed, where you don’t want to cut into interior wall space.
The big appeal here is cost. Pallets are often free if you ask around at hardware stores or landscaping companies, and the project genuinely takes an afternoon, not a weekend.
What You’ll Need
- One standard wooden pallet
- Sandpaper or sanding block
- Outdoor wood stain or sealant
- Lag screws or heavy-duty wall anchors
- Small hooks (optional, for hand tools)
Quick How-To
Sand down any rough or splintered edges, especially where hands will grip. Stain or seal the wood so it survives rain and sun.
Mount it vertically against a sturdy wall, fence post, or exterior stud using lag screws.
Slide long-handled tools into the natural gaps, then add a couple of hooks for smaller items.
Budget Tip: Ask at local nurseries or hardware stores. Many give away pallets for free if you just ask at the loading dock.
Organization Tip: Group tools by season. Keep spring planting tools in the lower slots where you’ll reach for them most often.
3. DIY Garden Tool Storage Corner Tower
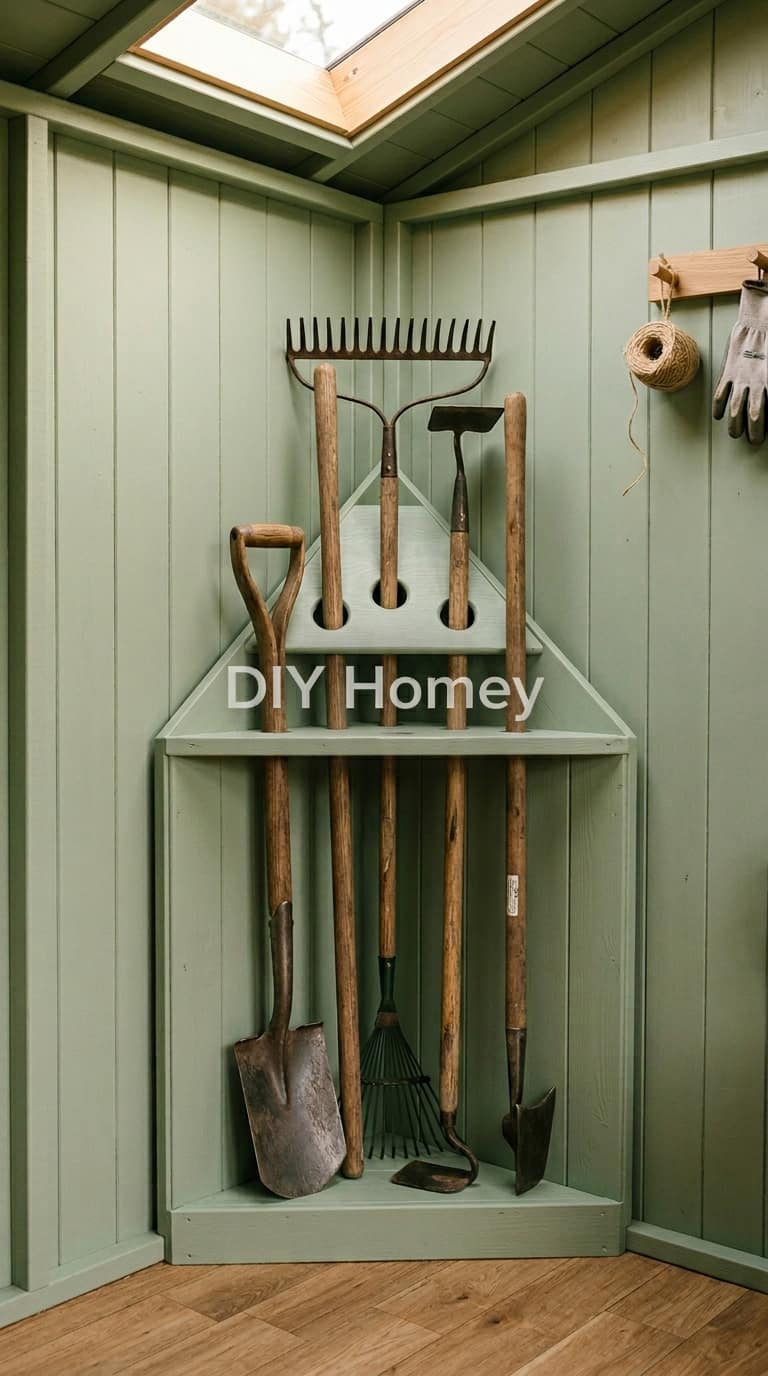
Every shed has at least one corner that’s basically dead space, usually collecting cobwebs or random junk nobody wants to deal with.
A corner tower fixes that by going vertical instead of fighting for floor space.
It’s built as a simple triangle that tucks right into the angle of the walls, with holes or slots cut into the top to keep each tool handle separated and upright.
This is the project I’d recommend if your shed is on the smaller side and you’ve already maxed out your wall space with shelving or hooks.
It keeps tools from leaning into each other and toppling, which is honestly one of the most annoying things about shed storage.
What You’ll Need
- Plywood sheet (¾-inch works well)
- PVC pipe sections, 4 to 6 inches long
- Wood screws
- Jigsaw or circular saw
- Exterior paint or sealant
Quick How-To
Cut a triangular base and top piece sized to fit your corner. Drill or cut holes in the top piece sized for the PVC sections, then glue or screw the PVC in place as individual tool slots. Assemble the frame, secure it to the corner studs or wall for stability, and seal or paint to match your space.
Budget Tip: Use leftover plywood scraps from a previous project. This build doesn’t need a full sheet, so offcuts work fine.
Organization Tip: Reserve the tallest slots for your bulkiest tools, like a spade or a digging fork, so they don’t tip the whole tower forward.
4. PVC Pipe DIY Garden Tool Storage Organizer
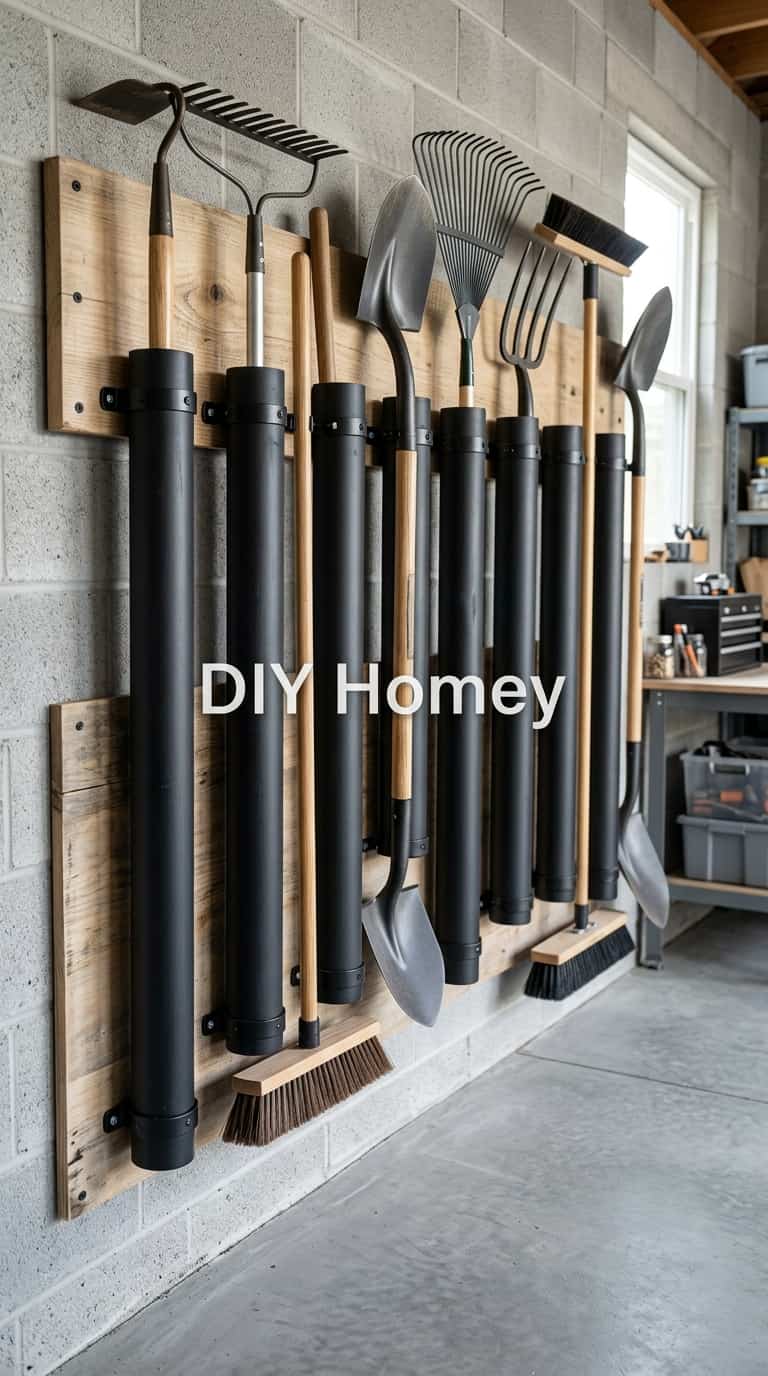
This is the cheapest project on this whole list, and it might be the most satisfying to build because it comes together so fast.
You’re basically creating individual slots for each tool, so nothing leans, slides, or falls over when you pull one piece out.
It’s a great fit for a narrow strip of wall, even just 18 inches, where a full rail system wouldn’t fit.
People love this one because PVC pipe is sold in bulk for almost nothing, and a single afternoon trip to the hardware store covers the entire material list.
It also keeps tool tips off the ground, which matters more than people think when it comes to rust.
What You’ll Need
- PVC pipe (3- to 4-inch diameter)
- Wood mounting board
- Hand saw, or miter saw
- Wood screws
- Sandpaper
Quick How-To
Cut the PVC into 5- to 6-inch sections, angled slightly at the top if you want a more finished look. Screw or strap each section onto the mounting board, spacing them about 4 inches apart. Mount the board to the wall at stud height, then slide the tool handles down into the openings.
Budget Tip: Buy PVC pipe in one long length and cut your own sections. It’s significantly cheaper than pre-cut pipe sold individually.
Organization Tip: Label each slot with painter’s tape if you’ve got kids or a partner who tends to put tools back in the wrong spot.
5. Pegboard Garden Tool Organization Wall
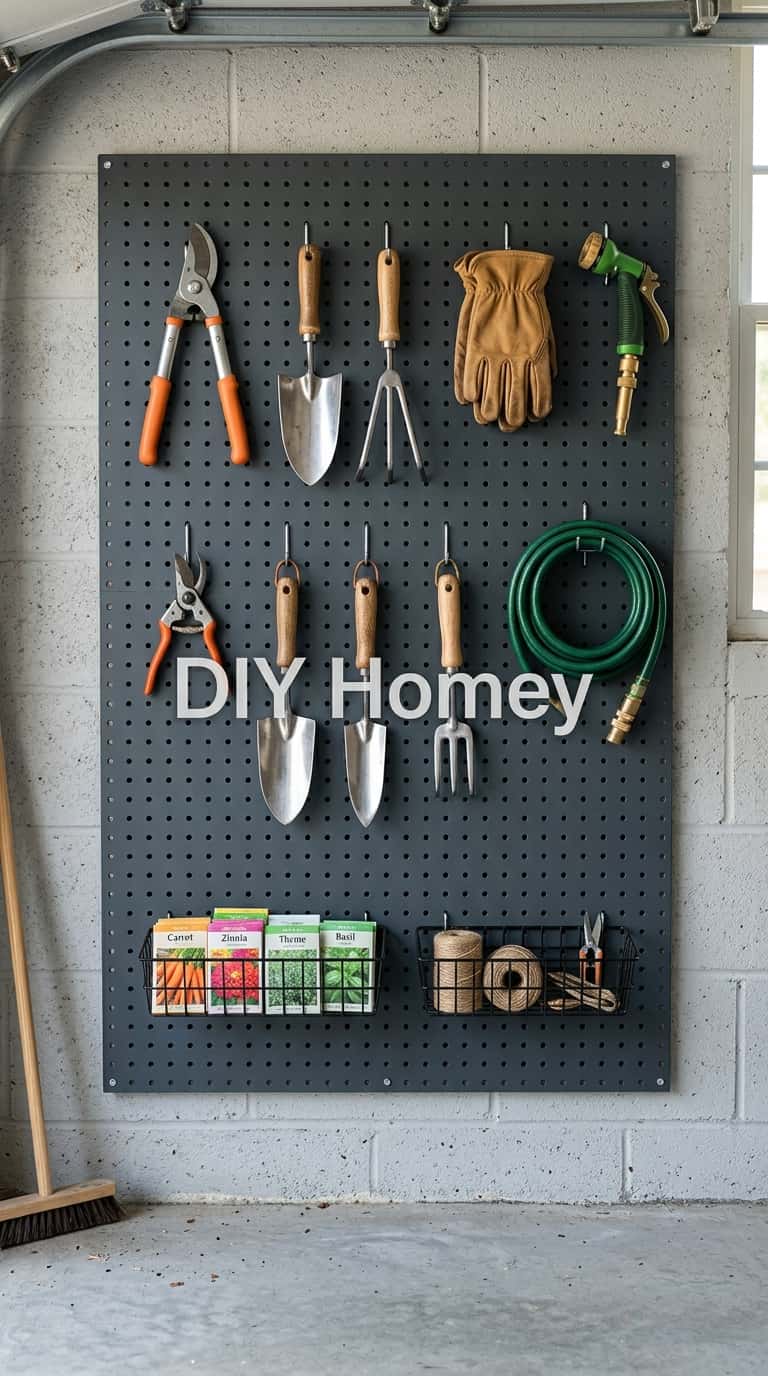
Pegboard is the one storage method that grows with you. Tool collections change every year.
You add a new pruning saw, retire an old trowel, pick up a hose nozzle you didn’t have before, and a pegboard lets you rearrange hooks in minutes instead of redoing the whole wall.
This works great for hand tools and smaller items that don’t need a full rail system, and it’s especially useful if you’re someone who likes to actually see everything at a glance instead of digging through a drawer.
It’s a favorite for garages that double as a workshop, since pegboard hardware is sold everywhere and comes in dozens of hook styles.
What You’ll Need
- Pegboard panel (4×8 or cut to size)
- Pegboard mounting spacers (1-inch standoff)
- Assorted pegboard hooks
- Small wire baskets
- Drill and screws
Quick How-To
Mount the spacers to the wall studs first. This gap is what lets the hooks slide in. Attach the pegboard over the spacers. Arrange hooks based on tool size and how often you use each one, leaving gaps for tools you’ll add later.
Budget Tip: Buy a single 4×8 sheet and cut it down yourself rather than purchasing a smaller pre-cut panel, which usually costs more per square foot.
Organization Tip: Trace an outline around each tool with a marker so everyone in the house knows exactly where it goes back.
6. Fence-Mounted DIY Garden Tool Storage Rack
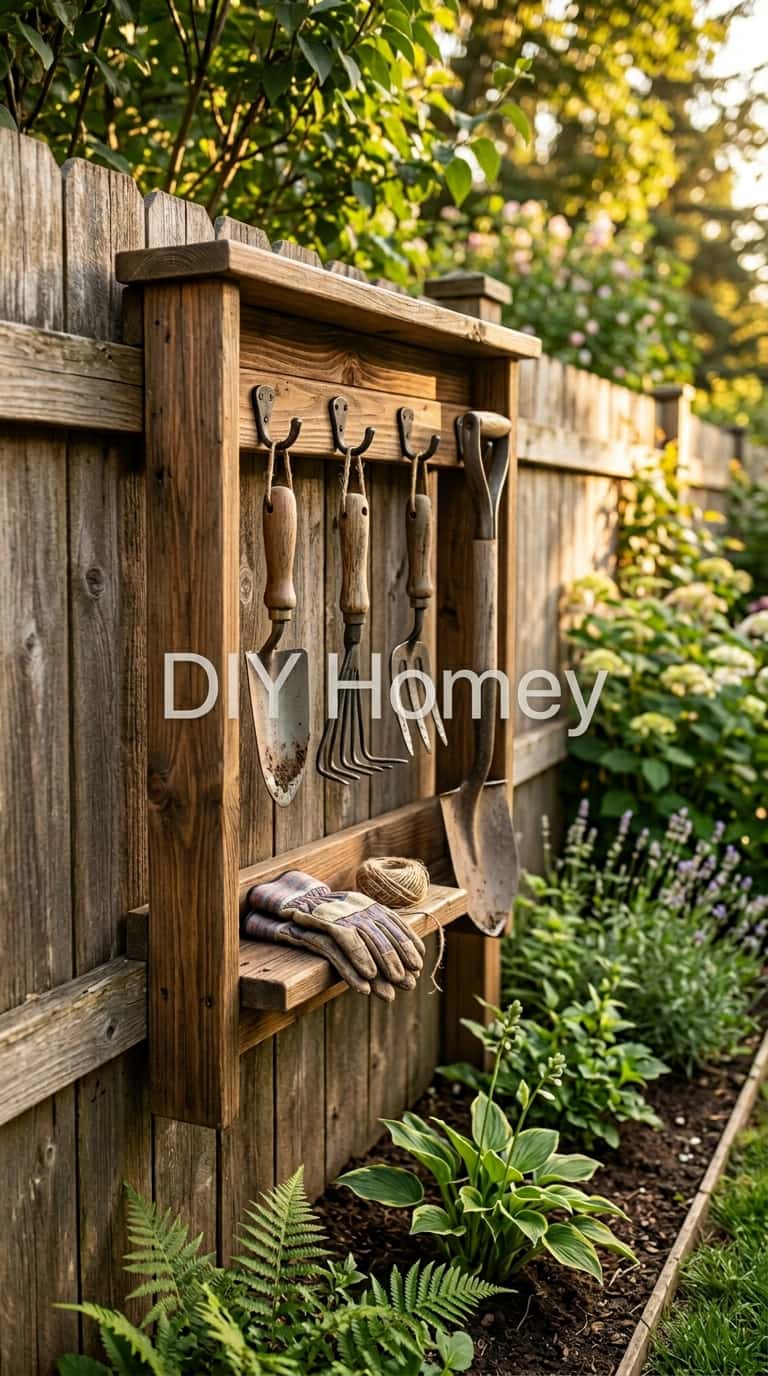
If most of your gardening happens outside and you’re tired of walking back and forth to the shed every five minutes, mounting storage right on the fence solves that instantly.
This setup keeps your most-used tools within arm’s reach of the actual garden beds, which makes a bigger difference than people expect once they try it.
It works best for homeowners who garden often during the season and want quick access without unlocking a shed or digging through a garage.
The key here is using weather-resistant hardware, since this rack lives outside full-time and takes on rain, sun, and temperature swings year-round.
What You’ll Need
- Outdoor-rated utility hooks
- Treated wood backing board
- Exterior wood screws
- Drill
- Weatherproof sealant or paint
Quick How-To
Attach the treated board horizontally across two or more fence posts so the weight isn’t resting on thin fence boards. Screw hooks into the backing board at varied heights based on tool size. Hang tools with handles facing down slightly so rain doesn’t pool on the wood.
Budget Tip: Reuse an old shelf board instead of buying new lumber. Sand and reseal it, and it’ll work just as well as something purchased new.
Organization Tip: Bring small hand tools inside during winter, even if the rack stays up — extreme cold makes wooden handles more prone to cracking.
7. Rolling DIY Garden Tool Storage Cart
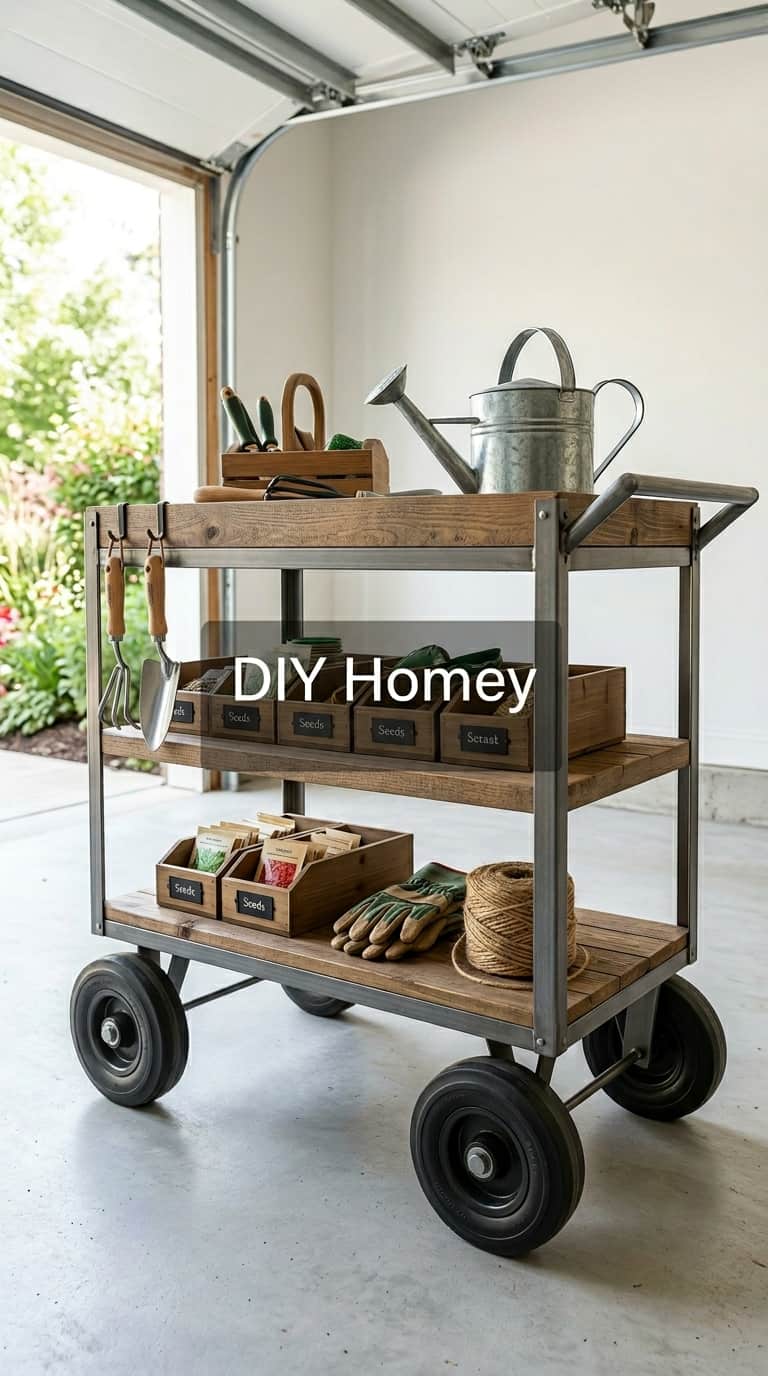
A rolling cart earns its keep if you’ve got a yard big enough that you’re constantly hauling tools from one end to the other. Instead of making three trips back to the shed, you load the cart once and push it to wherever you’re working.
This is especially handy during bigger seasonal jobs like fall cleanup or spring bed prep, when you need a mix of tools, gloves, and small supplies all in one place.
It’s also a smart option for renters or anyone who might move in a few years, since nothing about it is permanently attached to the house.
What You’ll Need
- Utility cart with locking wheels
- Small bins or baskets
- Bungee cords or elastic straps
- Weatherproof cover (if stored outside)
Quick How-To
Load heavier tools on the bottom shelf to keep the cart from tipping. Use bins on upper shelves to corral small items like seed packets and gloves. Strap tall tools to the cart’s frame with a bungee cord so they don’t slide off while rolling over grass or gravel.
Budget Tip: Check garage sales or local marketplace listings for secondhand utility carts — they hold up well and often sell for a fraction of retail price.
Organization Tip: Keep the cart stocked the same way every time you put it away, so loading up for the next job takes seconds, not minutes.
8. DIY Potting Bench With Garden Tool Storage
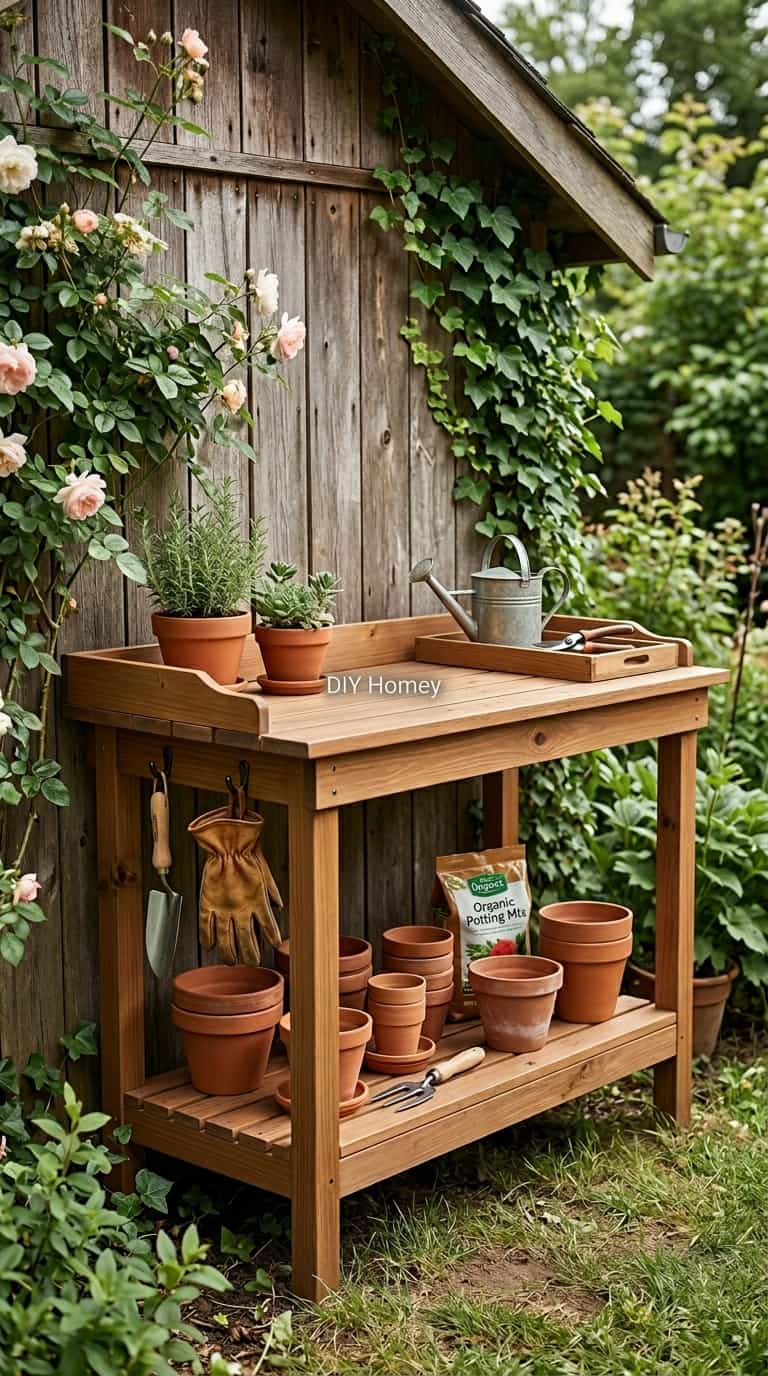
A potting bench is one of those projects that pulls double duty. You get an actual workspace for transplanting and potting, plus built-in storage underneath and around it.
This is the pick for anyone who does a lot of hands-on planting work and is tired of kneeling on the ground or balancing pots on a porch railing.
The open shelving underneath holds bins, pots, and bagged soil, while side hooks keep your most-used hand tools right where you’re working instead of back in the shed.
It’s especially popular with homeowners who garden as a hobby they actually enjoy spending time on, not just a chore to get through.
What You’ll Need
- Basic wood frame (2x4s) or repurposed table
- Plywood for the work surface and shelves
- Side hooks
- Wood screws
- Exterior sealant or paint
Quick How-To
Build or repurpose a sturdy table-height frame, then add a plywood shelf below for storage. Attach hooks to the side panels for hanging tools. Seal the wood surface so it holds up to dirt, water, and repeated use without warping.
Budget Tip: An old dresser or table with the top removed can be converted into a potting bench frame for almost no cost.
Organization Tip: Keep a small bin of “in progress” pots on the bench separate from finished ones, so you don’t lose track of what still needs watering.
9. Magnetic Garden Tool Organization Station
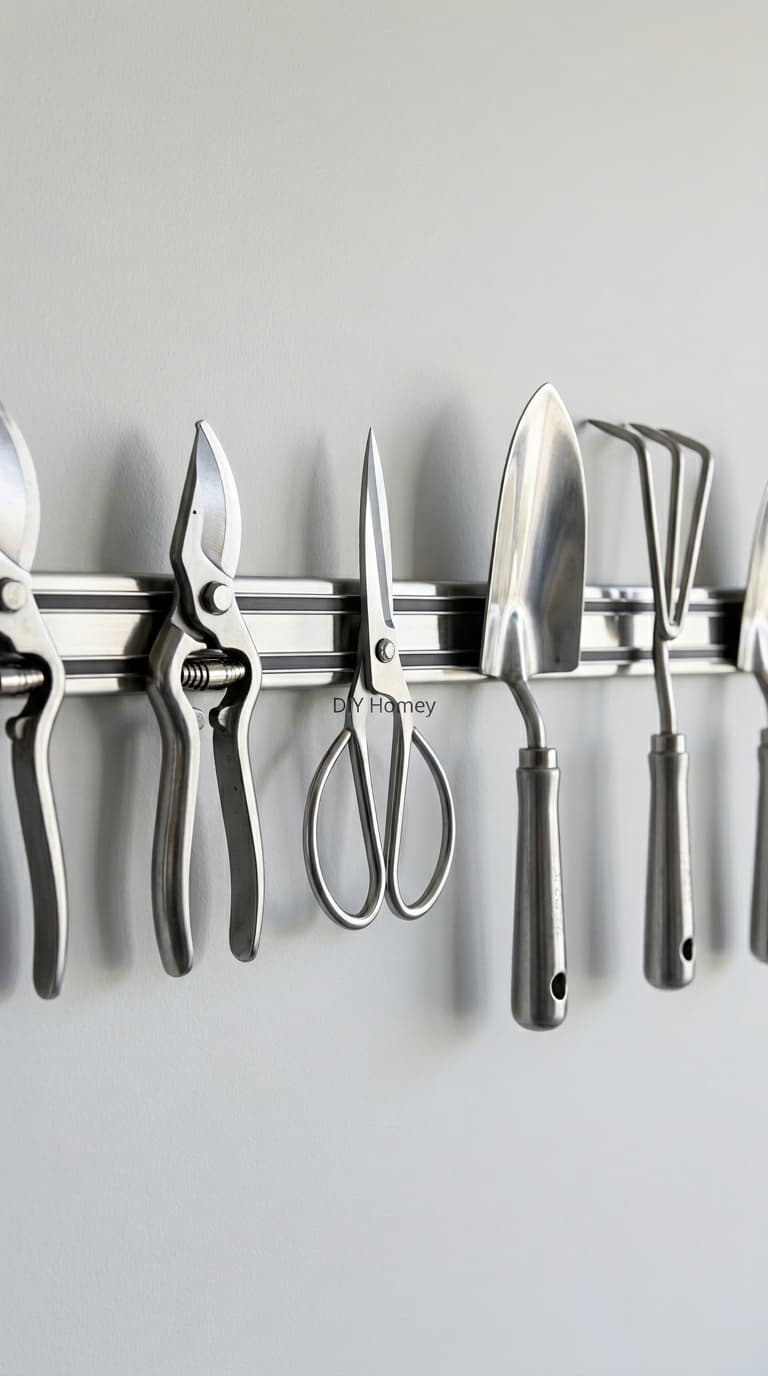
Most people don’t think about magnetic strips for the garden, but they’re honestly one of the best ways to store small metal tools like pruners, shears, and hand trowels. Tossing these into a bucket or drawer dulls the blades fast from rubbing against each other, and a magnetic strip keeps everything separated and visible at the same time. This works especially well near a workbench or potting area where you’re constantly grabbing and setting down small tools throughout a single gardening session. It’s a quick project, and it solves the very specific annoyance of digging through a junk drawer for the one pair of pruners that always seems to disappear.
What You’ll Need
- Heavy-duty magnetic tool strips
- Drill
- Screws and wall anchors
- Level
Quick How-To
Mount the strip at a height where you can see and reach it easily, usually around shoulder level. Make sure it’s level before driving in the screws. Press metal tools flush against the strip, spacing them out so blades don’t touch each other.
Budget Tip: Repurpose a knife magnetic strip from the kitchen section of a hardware store — they’re cheaper than ones marketed specifically for tools.
Organization Tip: Wipe tools dry before placing them on the magnet. Moisture trapped against metal speeds up rust, even indoors.
10. DIY Garden Shed Door Tool Storage Organizer
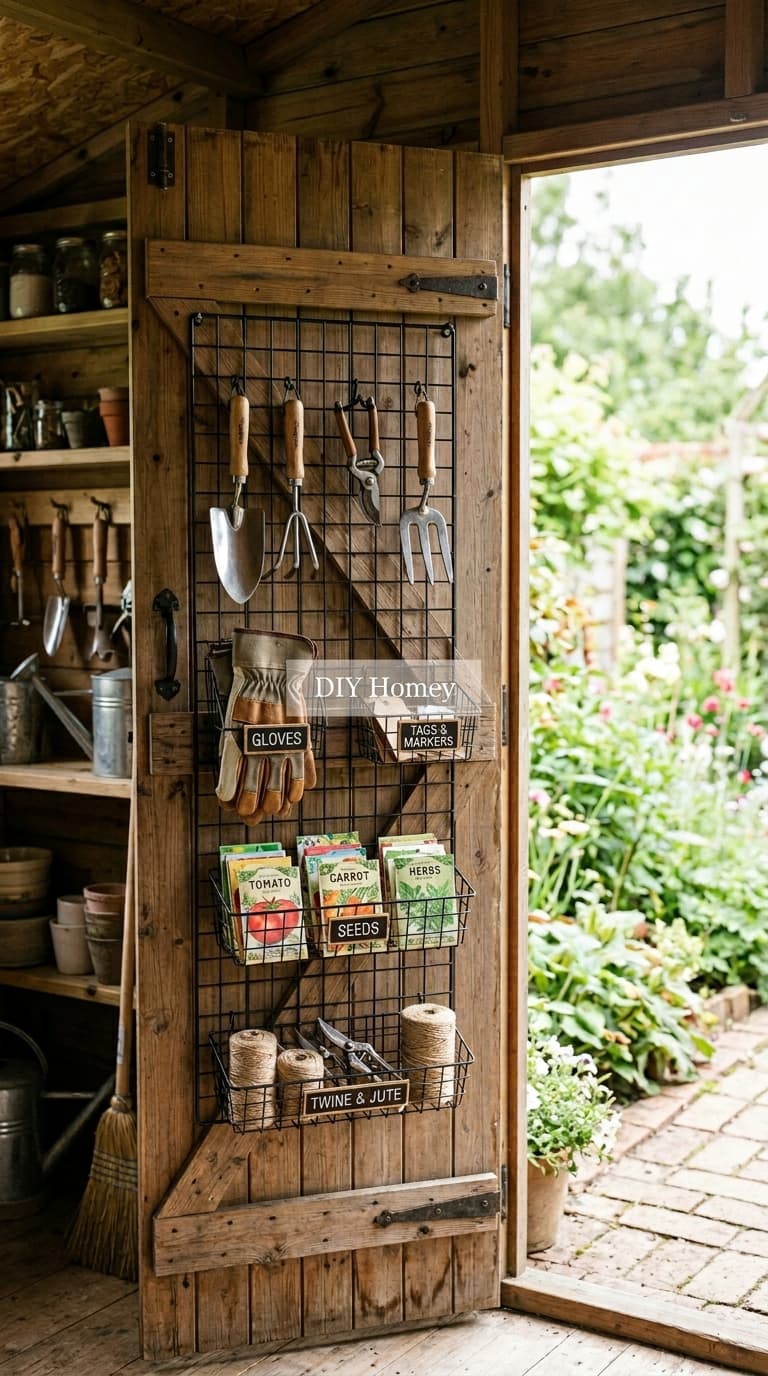
The back of a shed door is basically free real estate that almost nobody uses. A slim hanging organizer turns that flat, unused space into a home for all the small stuff that tends to get lost — gloves, seed packets, twine, plant tags, and hand tools that are too small for a rail system. This is a great last step after you’ve already tackled the main walls of your shed, since it doesn’t compete with floor space or wall space at all. It’s especially useful for keeping frequently grabbed items like gloves right at the exit, so you’re not searching for them every time you step outside.
What You’ll Need
- Lightweight wire storage panel or over-door organizer
- Small hooks
- Screws (lightweight, sized for hollow-core doors if needed)
- Measuring tape
Quick How-To
Measure the door panel to make sure the organizer fits without blocking the latch or hinges. Mount the panel using lightweight screws, so you’re not putting too much weight on the door itself. Load the lower pockets with heavier items and keep the top rows for lighter things like seed packets and gloves.
Budget Tip: A wire shoe organizer from a discount store works just as well as a garden-specific version and usually costs less.
Organization Tip: Keep this space for small items only — anything bulky or heavy puts unnecessary strain on the door hinges over time.
Frequently Asked Questions
- What is the best way to store long-handled garden tools?
Vertical storage almost always wins here. A wall rail, PVC pipe organizer, or even a repurposed pallet keeps shovels and rakes upright instead of leaning in a pile where they constantly fall over. Keeping handles off the ground also helps them last longer.
- How do I organize garden tools in a small shed?
Go vertical and use every wall, including the back of the door. A pegboard garden wall, a corner tower, or door-mounted organizers all add storage without eating into your already-limited floor space. Skip anything bulky, like a freestanding cabinet, if your shed is tight on room.
- What is the cheapest DIY garden tool storage idea?
PVC pipe organizers and repurposed pallets are usually the cheapest routes. Both can come together for under $20 if you already have basic tools on hand, and pallets are sometimes free for the asking.
- How do I keep garden tools from rusting?
Wipe metal blades dry before putting them away, and avoid storing tools directly on concrete or damp ground. Magnetic strips and rail systems that keep tools elevated and separated help a lot more than tossing everything into a bin.
- Can I store garden tools outside year-round?
Some can, but it depends on the tool and the setup. Weather-resistant racks with treated wood and sealed hardware hold up fine outdoors. Smaller hand tools with wooden handles do better when moved indoors or into a shed once temperatures drop, since freezing and thawing cycles crack wood faster than people expect.
Final Thoughts:
A disorganized pile of garden tools is one of those problems that’s easy to ignore until it’s not — until you’re late for a planting deadline and can’t find the trowel, or you nick yourself reaching past loppers that shouldn’t have been stacked that way in the first place.
The good news is that fixing it doesn’t take a big budget or a complicated build.
Every idea here can realistically be knocked out in a weekend, sometimes in an afternoon.
Garage storage solutions like a rail system or pegboard make the biggest dent if you’re starting from scratch, while smaller fixes like a magnetic strip or shed door organizer are perfect for cleaning up the leftover clutter once the big stuff is handled.
Pick the one project that solves your most annoying problem right now. Once that’s done, you’ll probably find yourself wanting to tackle the next one too.