Hello there, dear crafters!
Welcome to one of my absolute favorite sewing projects. I’m so excited to share this with you today because learning how to make an envelope pillow cover is truly one of the most rewarding and beginner-friendly projects you can try.
Whether you’re eight years old or eighty, this DIY envelope pillow cover project is perfect for anyone who wants to add a personal touch to their home decor.
You know what I love most about envelope pillow covers? They’re like magic!
No zippers, no buttons, no fussy closures just a simple overlap design that keeps your pillow insert snug and secure.
Plus, they’re so easy to remove for washing, which makes them incredibly practical for everyday use.
How to Make an Envelope Pillow Cover?
In this guide, I’ll walk you through every single step, from choosing your fabric to putting the finishing touches on your beautiful new pillow cover.
Don’t worry if you’ve never sewn before, I’ll be right here with you, sharing all my tips and tricks to make sure your project turns out absolutely wonderful.
What You’ll Need (Let’s Gather Our Supplies!)
Before we dive in, let’s make sure you have everything you need. Don’t panic if you don’t have every single item we can work with what you’ve got!
Essential Materials:
- Fabric (about 3/4 yard for a standard 18×18 inch pillow)
- Sharp fabric scissors
- Measuring tape or ruler
- Pins (lots of them!)
- Thread that matches your fabric
- Iron and ironing board
- Pillow insert (the fluffy part that goes inside)
Tools You’ll Use:
- Sewing machine (or just a needle if you prefer hand-sewing)
- Seam ripper (trust me, everyone needs one!)
- Fabric marker or chalk
- Safety pins (these are lifesavers for beginners)
Now, let’s talk fabric! For your first envelope pillow cover, I always recommend choosing something that’s easy to work with.
Cotton is absolutely perfect it’s forgiving, doesn’t slip around too much, and comes in gorgeous patterns and colors.
Avoid stretchy fabrics like jersey or anything too slippery like silk until you’ve got a few projects under your belt.
Linen is another wonderful choice, though it wrinkles easily. Canvas and denim work beautifully too, especially if you want something sturdy for a couch or outdoor setting.
The key is choosing something you absolutely love because you’ll be looking at it every day!
Step-by-Step Instructions (Here’s Where the Magic Happens!)

Alright, let’s get our hands busy! Take a deep breath—you’ve got this.
Step 1: Measure Your Pillow Insert
First things first, we need to know exactly what size we’re working with.
Measure your pillow insert from edge to edge in both directions. Most standard pillows are 18×18 inches, but yours might be different, and that’s perfectly fine! Write these measurements down somewhere you won’t lose them.
Here’s a little secret: we want our cover to be just slightly smaller than the insert. This gives us that plump, full look we’re after. So if your pillow measures 18 inches, we’ll cut our fabric pieces to make an 17.5-inch finished cover.
Step 2: Cut Your Fabric (The Foundation of Success)
This is where learning how to make an envelope pillow cover gets really exciting! You’re going to cut three pieces of fabric, and I’ll tell you exactly how.
For an 18-inch pillow insert, here’s what you’ll cut:
- One front panel: 18.5 x 18.5 inches
- Two back panels: 18.5 x 13 inches each
Those extra half-inches are called seam allowances, and they’re super important! They give us room to sew everything together properly.
Take your time cutting. Use a ruler or measuring tape to mark your lines with fabric chalk first, then cut along those lines with sharp scissors. Neat, straight cuts will make everything easier later on.
Step 3: Hem Those Back Edges (Creating the Envelope Opening)
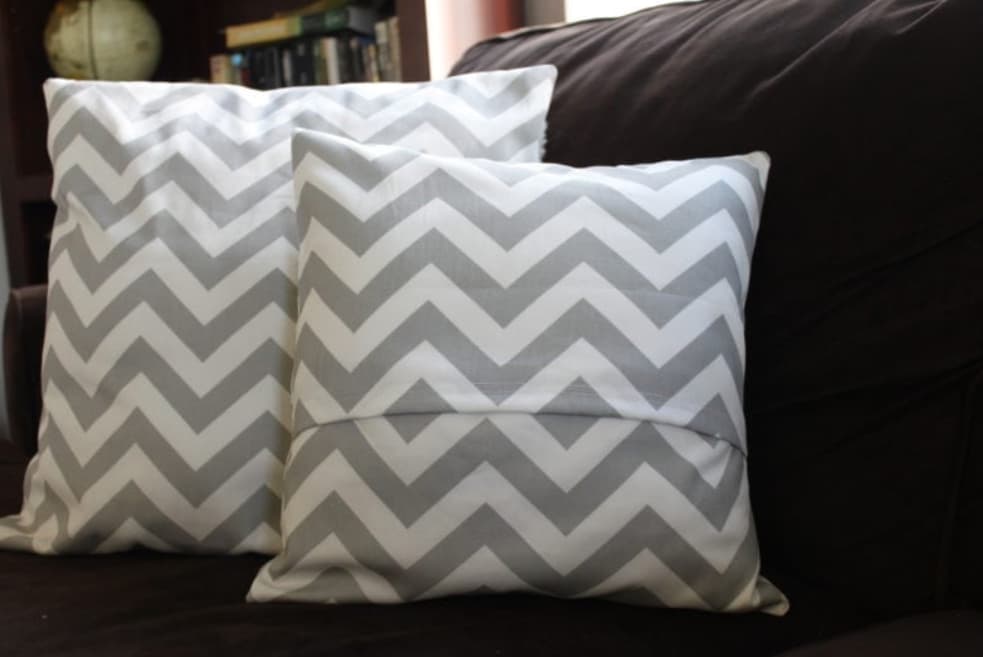
Now we’re going to create the overlapping edges that make this a true DIY envelope pillow cover design.
Take one of your back panels and find one of the shorter edges (that’s the 18.5-inch side). We’re going to make a nice, clean hem here.
Fold this edge over about 1/4 inch toward the wrong side of the fabric, then fold it over again another 1/4 inch. This creates a double-fold hem that won’t fray. Pin it in place, then sew along the inner fold.
Repeat this process with the other back panel. When you’re done, you’ll have two pieces with one beautifully hemmed edge each.
Don’t worry if your stitching isn’t perfectly straight—remember that this is about learning and having fun, not achieving perfection!
Step 4: Pin Everything Together (Assembly Time!)
Here’s where your project really starts looking like a pillow cover! This is my favorite part of any how to make an envelope pillow cover tutorial because you can finally see it all coming together.
Lay your front panel face-up on your work surface. Take one back panel and place it face-down on top of the front panel, with the hemmed edge toward the center of the pillow. The raw edges should line up perfectly with the front panel’s edges.
Now take your second back panel and place it face-down as well, with its hemmed edge overlapping the first panel by about 4 inches. The raw edges of this panel should also line up with the front panel’s edges.
Pin around all four edges, going through all the layers. Use plenty of pins—they’re your friends!
Step 5: Sew It All Together (The Home Stretch!)
Set your sewing machine to a straight stitch, and use a 1/2-inch seam allowance all the way around.
Start sewing at one corner and work your way around the entire perimeter. Go slowly, especially at the corners, and remember to backstitch at the beginning and end to secure your seams.
When you reach the thick areas where the back panels overlap, your machine might slow down a bit. That’s normal! Just take your time and let the machine do its work.
Step 6: Trim and Turn (The Big Reveal!)
Once you’ve sewn all the way around, trim the corners at a diagonal, being careful not to cut through your stitching. This helps create nice, sharp corners when you turn the cover right side out.
Now comes the exciting part—turn your DIY envelope pillow cover right side out through the envelope opening in the back. Use a blunt tool like a chopstick or the eraser end of a pencil to gently push out the corners.
Press the entire cover with your iron, paying special attention to the seams and corners. This step makes such a difference in how professional your finished project looks!
Customization Ideas (Make It Uniquely Yours!)
Now that you know the basic technique, let’s talk about making your pillow cover extra special!
You can add decorative trim around the edges before you sew the panels together. Rickrack, lace, or even colorful bias tape can transform a simple pillow into something spectacular.
Consider using contrasting thread for a fun topstitching effect, or try your hand at some simple embroidery on the front panel before assembly.
Fabric paint or markers can create beautiful designs too. Let the kids help with this part—they often come up with the most creative ideas!
For a more advanced touch, try adding piping around the edges or creating a quilted effect on the front panel.
Common Mistakes and How to Avoid Them
Let me share some gentle wisdom from my years of teaching this craft.
The most common mistake I see is measuring incorrectly. Always double-check your measurements before cutting, and remember that it’s better to cut a little large than too small.
Another frequent issue is forgetting which way the fabric should face when pinning. Remember: right sides together for sewing, then turn it right side out afterward.
Don’t skip the pressing steps! A good press with the iron makes everything look so much more professional.
If your corners don’t come out sharp, don’t worry. This gets easier with practice, and even slightly rounded corners look handmade and charming.
Wrapping Up (You’re Almost Done!)
Look at what you’ve accomplished! You’ve just completed your very own envelope pillow cover, and I bet it looks fantastic.
This project really shows how accessible and enjoyable it is to learn how to make an envelope pillow cover, and I hope you’re feeling proud of your work.
The beauty of mastering this DIY envelope pillow cover technique is that you can now make dozens of them in different fabrics and sizes.
Think about how you can transform your living space with handmade pillows that perfectly match your style and color scheme.
Also Check:
Conclusion:
Congratulations, my dear crafter! You’ve just learned one of the most useful and satisfying sewing skills there is.
I hope this guide has shown you that learning how to make an envelope pillow cover doesn’t have to be intimidating or complicated.
With just a few basic materials and some patience, anyone can create beautiful, functional pillow covers that rival anything you’d find in expensive home decor stores.
Remember, every expert sewist started exactly where you are right now. The more you practice this DIY envelope pillow cover technique, the more confident and creative you’ll become.
Before you know it, you’ll be dreaming up new fabric combinations and sharing your knowledge with friends and family.
Keep sewing, keep creating, and most importantly, keep having fun with your crafting adventures.
Your home is going to look absolutely beautiful with your handmade touches throughout it!
Happy sewing, everyone!